Showing posts with label Machine Quilting with a Walking Foot. Show all posts

Thursday, May 29, 2014

Irish Blue

I thought I would squeeze a quick post in before the month of May is over!  I've been sidetracked this month, working on some old needlework projects and framing some pieces that have been sitting around for years in the closet, so I only managed to get one quilt finished, but I thought I'd do a little show and tell anyway.
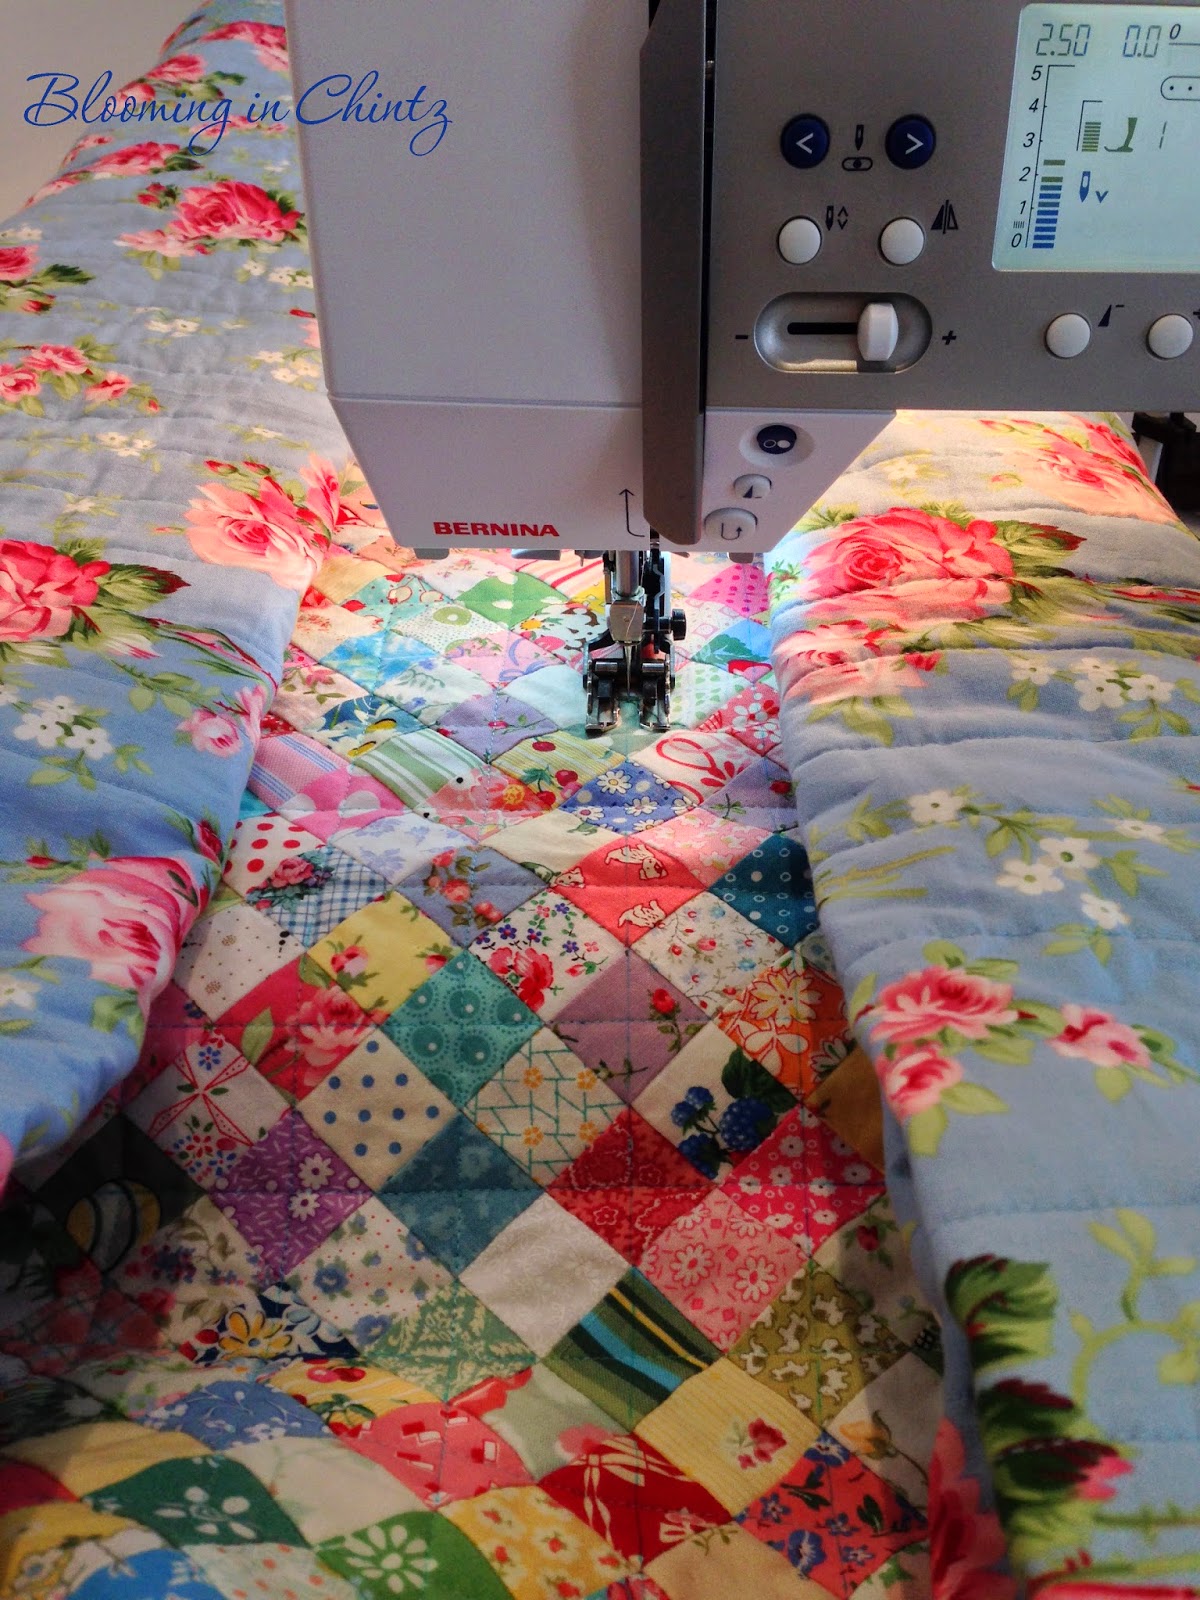
I finished quilting this quilt earlier this month and thought you all would like to see more cables done with a walking foot.  This is a triple Irish Chain quilt I did a few years back in blue and white as a class sample for a workshop I taught.  I waited to quilt it until recently, it's been one of several in a stack needing to be quilted.  This quilt was also a tester for a border cable I've been wanting to try as well as a feathered wreath in the alternating white blocks.
I know it may be somewhat difficult to see the quilting in some of these pics, once again, a photographer I am not!  But I did try shining a lamp off to the side so the quilting would show a little more.  There is also a small cable in the inner white border.  The straight lines and all the cable quilting were done with a walking foot.
Don't you love this cable?  I had seen a similar one on an antique quilt long ago and then came across a drawing of it in a very old quilt magazine.  I photocopied it, enlarging it many times, and then reworked it to figure out the repeats so that it would fit on my border.  The inner cable is from a stencil I have, perfect for a narrow space.
This was another experiment, trying free-motioned feather wreaths.  I will admit, I am not a big free-motion quilter, although I have done some.  I love the look, but don't really enjoy doing it, mainly because I wind up with such a sore neck and back, I feel like I've been in a car accident!  And I do try very hard not to tense up, but it still requires a great amount of physical and mental energy, no matter how much I try to relax.  But that being said, I am thrilled with the results.
Here you can see how the border wraps the corner of the quilt, a bit different than many that you see.  And if you look closely at the inner white border, I just ran it into the seamline and didn't bother wrapping the corner on that one.  So it works either way, it's really a matter of taste and how much extra work you want to put into it.

And a quick note here, this quilt is really VERY white, but once again, due to lighting and amateur photography, you are seeing a dirty beige!  I'm sorry, but I figured in this case, you really needed to see the quilting more than all that whiteness.

For those of you that are curious, the batting I used is Hobb's 80/20, whoops, my mistake, it is Mountain Mist 100% cotton.  Normally I use Hobb's 80/20, but I wanted to try this one out for a change.  And I loved it, it's very thin and drapes well, very similar to an antique quilt.  The top thread I quilt with is Wonderfil's Invisafil, my absolute favorite thread for quilting.  It is very fine, similar to silk at 100 wt., but is a very soft polyester and very strong.  It sinks into the fabric, so you see the indentation, not the thread, and it works extremely well for scrappy quilts when you have a wide array of colors and prints, blending in almost perfectly on most colors.  I have used it now exclusively for many years and absolutely love it.  And in the bobbin I used Wonderfil's Konfetti 50 wt. Egyptian cotton, a very nice, low-lint cotton thread.

And finally, I want to put out a HUGE thank you and GIANT group hug to all of you that have commented or e-mailed me on the tutorial I posted on quilting cables with a walking foot!!!  I am BLOWN AWAY at the response I received, I truly had no idea it would reach so many of you!  It makes me happier than words can say to hear from you.  And to know there are like-minded women out there that feel the same way I do about traditional style quilting is just so reassuring to know that I am not alone in how I feel!  Let me just say that when I started this blog, it was a bit nerve wracking writing to "air" and not thinking that anyone would read or care what I had to say.  So I just have to let you all know that bloggers DO want your comments, especially me!  And I hope that all of you that took the time to write received my replies because I did respond to everyone.  If you aren't getting a response from me, please let me know!  I am still trying to figure this all out and sometimes it's by the seat of my pants.

Hope you continue to be inspired!  Until next time. . . .Happy Quilting!!! 

Thursday, April 3, 2014

Quilting Cables

This is going to be a long one, sorry!  But in order to get the point across, this post required lots of pictures and I didn't have anyone nearby to video a tutorial, so sit back and enjoy, if possible!  If you've been following me on Instagram, you've seen some pictures of my postage stamp quilt with quilted cables in the borders.  This has raised several questions as to how I do this.  Most people thought this was done with free-motion quilting, but IT IS NOT!  This is all done with a walking foot, it's do-able for the beginner, you can do this on your home sewing machine with the proper accessories, and the results are worth the extra effort.
bloominginchintz.blogspot.com
I strive for a pretty traditional look in my quilts and in my quilting.  I really love the LOOK of hand-quilted quilts, particularly antique Amish quilts.  When I started quilting way back when, I tried hand-quilting ONCE, and that was enough!  But I didn't want to quilt my quilts just any ole way, I wanted them to have a "finished" look, almost like they are antiques themselves.  So I did a lot of straight line quilting, read several machine quilting books that were out at the time, and really studied antique quilts and how they were quilted.

Cables in borders appeared again and again.  After thinking about it, I thought it couldn't be that difficult to do with a walking foot, it's basically a continuous line with gentle curves.  And I still had not jumped into free-motion quilting at this point, I was never happy with my results and was too impatient to practice or sacrifice a quilt top.  But after my first quilt that I quilted cables in the border, I was hooked.  It looked almost hand-quilted and I loved the look.  And best of all, it was easy to do.

bloominginchintz.blogspot.com
So to make this easy to understand, I tried to photograph the process I go through while I quilted Forty-Nine Cents.  I do mark all of my lines I intend to quilt with a water soluble blue marker.  I've been using these markers for over 20 years and never had issues with them not coming out.  I also WASH all of my quilts as soon as they are quilted, so this gives me peace of mind that I know the marker doesn't have enough time to set in the fabric and become permanent.  And I quilt a top as soon as I mark it, I don't let it sit around for weeks or months.

Basting is also critical and I do pin-baste.  Every one has a variation on the technique, but my method is based on Harriet Hargrave's method in her book, Heirloom Machine Quilting.  I use an old folding table, clamp the backing fabric to it first, then lay the batting over it and then the top.  I am very careful to keep everything smooth and pin fairly close together.  When I finish basting, I check my backing for pleats or puckers.  Now is the time to correct them and repin if necessary!  Otherwise they will just get quilted in permanently later.

bloominginchintz.blogspot.com
I mostly do some variation of grid quilting, channel quilting, or other combination of straight lines in the main body of the quilt.  The above pictures show how I package the quilt to feed it into the machine.  The walking foot does most of the work but I do support the front so that it doesn't drag on the needle.  This part is just a matter of sewing along the lines.  I remove the surrounding pins as I go and after each line is sewn.
bloominginchintz.blogspot.com
In this photo above, I am done quilting the lines in the center of the quilt and am ready to start on the borders.  This quilt has an inner border with a smaller, tighter cable, a pieced border with straight line channel quilting, and an outer border with a larger, gently curved cable.  I approach everything from the center, working out to the edge, or from left to right.  For a beginner, until you have done several quilts with cables, I would suggest only doing them on the outer most border at first until you get the hang of it.

Every brand of sewing machine is different, so talk to your dealer about what will work for you regarding a walking foot and a single hole throat plate.  It can be an investment, but if this is something that you think you will do, it's worth the money spent.
bloominginchintz.blogspot.com
I set my ironing board directly to the left of where I am sitting.  At this stage, the quilt isn't packaged like it was when I was sewing the straight lines.  The ironing board helps support the excess to the left and gives me a larger flat surface so the quilt doesn't hang down the front of my counter.
bloominginchintz.blogspot.com 
The cables on this quilt happen to wrap around the corners.  Sometimes I use cables that run off the edge of the quilt, it just depends.  But in this case, I want to start in a seamline so that my starts and stops are hidden.  Here I am pulling up the bobbin thread to the top of the quilt.
bloominginchintz.blogspot.com
Once I pull both the top and bobbin threads off to the side, I put the needle in the DOWN position right in that seamline.  The needle must stay in the down position throughout because this does require raising and lowering the presser foot.
bloominginchintz.blogspot.com
Since I needed two hands to photograph, I placed my Machingers quilting gloves on the quilt so you can get an idea of where I position my hands.  Please note that BEFORE I start sewing on this line, I removed the first safety pin!  I usually keep pins in until I am actually sewing in the immediate area.
bloominginchintz.blogspot.com
Here is another shot that shows an overall view of where my hands are in relation to the rest of the quilt.  Keep in mind, this is fairly slow sewing, very unlike free-motion.  I am using my hands almost like I would if I was free-motion quilting, palms flat, and guiding the quilt under the needle, following the line.  On a tighter cable such as this one in the innermost border, it required me to raise and lower the presser foot fairly often to get around the curves.  If you have ever machine-appliqued around circles or shapes, it's the same idea.  The larger cables allow for a little more speed, but for me, it's not about how fast I can quilt, it's about the finished look in the end.

The other thing that takes a little time is you will constantly have to arrange, rearrange, and adjust the position of the rest of the body of the quilt, especially when you are sewing a cable that wraps around the four borders.  You are sewing one cable line at a time, all the way around the four sides each time.
bloominginchintz.blogspot.com
Here I have ended the first line of quilting.  I left enough thread to triple knot both pairs, the beginning threads and the ending threads, and then threaded each pair onto a crewel needle, one pair at a time, and buried the threads in between the layers.  I bury the threads at the end of each line of stitching as I progress, it makes it much easier than doing them all at once when you are finished. 
bloominginchintz.blogspot.com
These pictures show how I am progressing to each line, one at a time, working from left to right.
bloominginchintz.blogspot.com

bloominginchintz.blogspot.com
And here I have completed all the quilting!  At this point I am so happy to be done, I can't wait to get it trimmed, squared, and in the wash next. 
bloominginchintz.blogspot.com
After trimming off the excess from the edges of the quilt, I run the edge of the entire quilt through a serger (overlock machine).  You could also do a zigzag or similar stitch.  YES, I do wash my quilt BEFORE I put the binding on.  And of course, I don't want the edges to ravel and fray in the wash.  Plus this gives me a nice flat edge for binding.  The main reason I wash it first before binding is that I want the quilt and batting to shrink and do all its puckering beforehand.  Afterwards, I put on the hanging sleeve, the binding and the label and because I've already washed the quilt, these will remain smooth and flat and do not pucker if I wash the quilt later.  This is critical for quilts that compete in shows.  Judges don't like to see puckered or bumpy bindings!
bloominginchintz.blogspot.com
And here are some shots of the finished quilt. . . 
bloominginchintz.blogspot.com

bloominginchintz.blogspot.com
Below are some pictures of cable stencils and photocopies of stencils I've altered to get a certain size and repeat to fit specific borders.  Depending on the border, sometimes I use a stencil and mark the quilt directly through it and other times I use a photocopy underneath the quilt top and trace it.
bloominginchintz.blogspot.com

bloominginchintz.blogspot.com

bloominginchintz.blogspot.com 
 And here are a few additional pictures of borders below.  The possibilities are endless!
bloominginchintz.blogspot.com

bloominginchintz.blogspot.com


bloominginchintz.blogspot.com

bloominginchintz.blogspot.com

Well, I hope that will inspire a few of you to try this yourselves.  Just remember, start with something small and simple to get the hang of it.  It's really easy and the effects are pretty impressive.  Feel free to ask me questions, I'm sure I've left out something!  Happy Quilting!!

2/3/2015 UPDATE:  PLEASE SEE MY POST ON HOW I MARK QUILTS FOR MORE INFO ON WATER SOLUBLE PENS AS WELL AS INFO ON STENCILS.  THANK YOU!

3/30/2017 UPDATE:  PLEASE SEE MY POST ON HOW TO FIT CABLES ON A BORDER FOR MORE INFO.